
People often complain about the amount of data entry that a clinical trial management system (CTMS) requires and how difficult it is to obtain reports tailored to their needs. After all, the value of any CTMS is in utilizing the data to plan, manage, make decisions for clinical trials. The easiest solution? Creating personal views that let you see exactly what you need to see. Let’s go through an example.
Suppose you would like to see a specific subset of trial data but would like to have that data saved so every time you logged into the clinical trial management system you would be presented with that information. Or maybe you have a large project with multiple studies and sites and need to be able to find the records you need without sorting through irrelevant sites. In those situations, a personal view in your clinical trial management system may be the best way to present you the data you want without relying on a developer to create a report. A personal view gives you the advantage of showing you relevant data and, unlike reports or exports, personal views also provide the means to quickly navigate to the records presented. So I’m going to demonstrate how to create a view. My view is going to present the sites that either have been started in the current year or are scheduled to start in the upcoming year.
For this personal view, I know I want to see Project, Study, and Site information, and also some keysite milestones. Once I determine the fields I want to be able to see, I can then apply filters to show me just the records that are relevant to me.To begin, let’s navigate to Sites in the clinical trial management system.
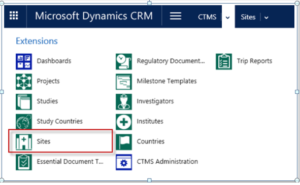 Figure 1: Navigate to Sites entity
Once there, you’ll see the Active Sites view. Next to Active Sites is a down arrow, click on that and select Create Personal View:
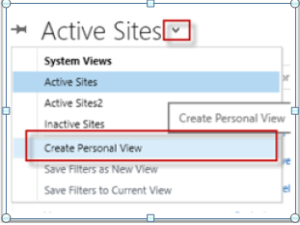
Figure 2: Select Create Personal View
The next thing you’ll see is the query window. This is where the view is created. Start by clicking on Edit Columns button in the Advanced Find tab of the ribbon:
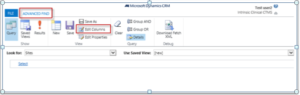
Figure 3:Locate the Advanced Find tab and click Edit Columns
The Edit Columns window opens and you’ll see that it’s populated by default with several standard CTMS columns. For this view, I don’t really care to see Study Country, Institute Name, Institute Location, or Investigator Name, so let’s start by clearing out the fields we don’t want. To select a column to be removed, click on the column heading. Once it’s selected, it will be outlined in green. In the Common Tasks pane on the right side, click Remove. Repeat this step for every field to be removed in the clinical trial management system.
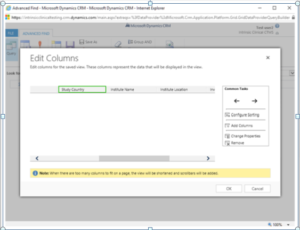
Figure 4: Selected column outlined in green, ready to be removed
Once all columns are removed, we’re left with four columns. The next thing to do is to add the columns we do want to see. I’m interested in seeing some key milestone dates, so I start by clicking on the Add Columns link in the Common Tasks pane on the right. This brings up the Add Columns window. I start by going through the list of fields and placing a check mark next to the ones I want to display. For my personal view, I want to add Planned and Actual End, Planned and Actual Start, Planned and Actual Activation, so I find each in the list and check them off.
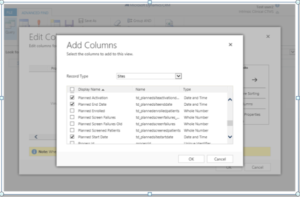
Figure 5: Select the columns to be added to the view
But I also want to see some Study Related information in here and when I scroll the list of fields, I can’t find the ones I want. That’s because I’m in the wrong entity (table of information). By clicking on the dropdown next to Record Type, I can select Protocol ID (Study) from the list and continue selecting my fields:
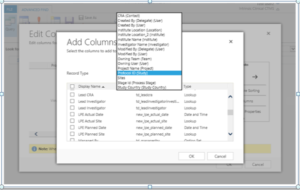
Figure 6: Update the Record Type field to switch entities
Once I select it from the drop down list, the fields available to me are updated and I can continue selecting more fields. For this view, I also want to see Planned Start and End dates for the study, so I check each off and then click OK in the Add Columns window in the clinical trial management system.
Now that we have all the fields in the Edit Columns window, let’s move them around so that they appear in the order we want to see them. I want the columns to appear in the following order:
- Site Number
- Project Name
- Protocol ID
- Site Status
- Planned Start Date (Protocol ID)
- Actual Start Date (Protocol ID)
- Planned End Date (Protocol ID)
- Actual End Date (Protocol ID)
- Planned Start Date
- Actual Start Date
- Planned Activation Date
- Actual Activation Date
- Planned End Date
- Actual End Date
To move a column, I click on the column heading and when I see it outlined in green I use the left and right arrow buttons in the Common Tasks pane to move them.
Once all my fields are in order, then it’s time to click OK in the edit column window. That brings me back to the query window. Before we go on, let’s see what we have so far. To do that, simply click on the Results button (the big red exclamation point in the ribbon). The results look like this:
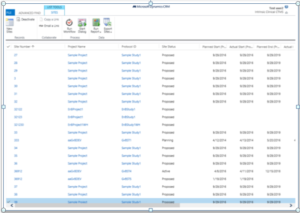
Figure 7: Results window after all columns are added
This is a great start but it’s still more than I want to see. I’m only interested in seeing things that had a start date in the current year or next year. Luckily, I can add filters to get just the results I want. Let’s try that next.
First start by clicking the Advanced Find tab. You’ll notice that in the main area under the ribbon, there is a hyperlink that says “select”. Clicking on it presents a dropdown. From the dropdown, I’m going to select Actual Start Date.
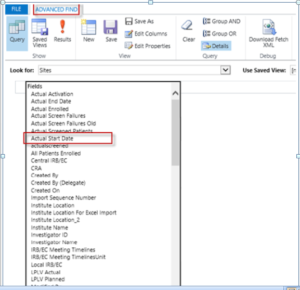
Figure 8: Select the fields to use for filtering
The window updates and there is now another drop down just to the right with “On” appearing as a hyperlink. Click on that drop down and select “This Year”. The window should look like this:
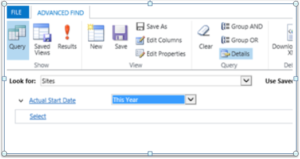
Figure 9: Filtering by Actual Start Date occurs This Year
You’ll notice there’s now a new line below the original one. Let’s repeat the steps above for the Planned Start Date field. Once that’s done, let’s create two more rows – again for Actual Start Date and Planned Start Date but this time let’s use the Next Year filter. When you’re done, the window should look like this:
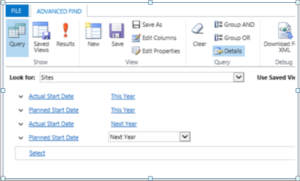
Figure 10: Filters to show dates that occur this year or next year
Let’s check our results now. Clicking the Results button brings back the following:
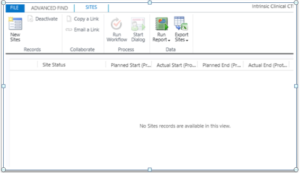
Figure 11: Results after adding filters
Wait – how can there be no site records available?
The reason is that there is no item that meets all the criteria. The way we left the query was to say “show me all records where all the following condition are true: Actual Start Date is this year and next year and Planned Start Date is this year and next year”. Clearly no one date can occur in two different years, so there are no results.
Let’s fix this by adding some logic. Let’s go back to the Advanced Find tab and do that now. Start by clicking the down arrow to the left of the first filter: Actual Start Date: This Year. Choose “select row” from the drop down.
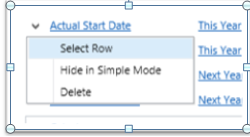
Figure 12: Choose “Select Row”
The row will be highlighted. Let’s repeat the same step for all four rows so that they’re all selected.Once all rows are selected, let’s go to the ribbon and select the Group Or button.
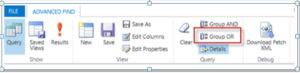
Figure 13: Select Group OR button after selecting all rows
Once that’s selected, you should see this:

Figure 14: Filters with Group OR added
This query logic means “Show me all results where any one of the selected criteria is true”. Let’s click on the results button now and see what we get:
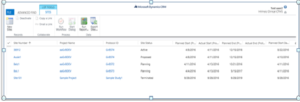
Figure 15: Results after filters are updated
Much better. We now have results that match the criteria. So now that we have set this up, how can we avoid all this work every time we want to see the same information? Let’s save our view. Click on the Advanced Find tab again and click on the Save As button.
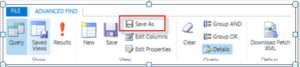
Figure 16:Click on Save As button to save your view
In the Save as new View window, give the view a meaningful name and if desired a description and then click Save.
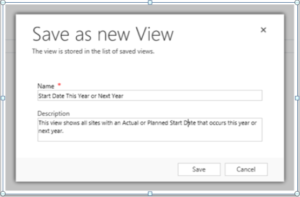
Figure 17: Give the view a name and, if desired, a description
Once the view is saved, click on the x in the upper right of the Query window to close it. You will be returned to the Active Sites window. To see your new view, let’s click on the down arrow next to Active Sites. In there, you’ll see your newly added view.
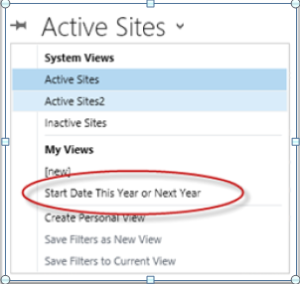
Figure 18: Find your view in the list of views
Select it and your results will appear in the clinical trial management system.
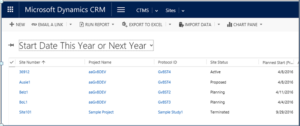
Figure 19: View results displayed from the Sites entity page
This view is what’s considered a personal view, meaning that you are the only one who can see it. The view will be there every time you log in to the CTMS.
One last thing – what if you want to modify or delete a view? Again, click on the down arrow next to the view name and select Create Personal View. On the Advanced Find tab, click on Saved Views.
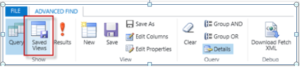
Figure 20: Click Saved Views to modify views you already created
You will be presented with a list of your personal views in the CTMS. Click on an existing view name to return to the query window and make modifications. Or if you no longer want to see that view, click just to the left to select the row and then in the ribbon, click on Deactivate:
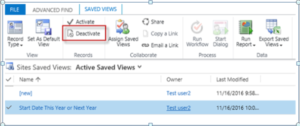
Figure 21: Remove a view by clicking on the Deactivate button
Close the query window and your view will no longer appear in the list when you click the down arrow on the Sites page.
So that’s how to create a personal view in clinical trial management system! Use these steps to help you quickly navigate to items without having to weed through unhelpful items. And don’t be afraid to click around and try some of the buttons we didn’t discuss here. The beautiful thing is, these are personal views, so even if you mess something up, no one will see it.
Happy view making!!